

I’ve said it before: the internet is a wealth of information and resources on how to trek the W, and I depended greatly on them when the idea of this trip began brewing in my mind, a year ago.
What I’ve got here is a two-part guide of my own, comprising what I learnt from my own experience, combined with what I got of my internet search,
In part I, I put together an FAQ, which you can check out here.
Here in part II, I’m going into some detail about my itinerary, followed by some general tips on planning your own trip. Warning: long post, lots of photos.
For reference, my hike took place in late-March/early-April 2017, close to the end of the shoulder season.
Chile was my very first stop in South America. I landed in Santiago, caught a flight the next morning to Punta Arenas, and then a bus to Puerto Natales, arriving in the late afternoon.
The next day, my friend and I started our hike.
Day 1
Total distance walked: 20.8km, including the 7km from Laguna Amarga to trail entry point.
Elevation gain: About 740m from Las Torres hotel to Base de las Torres lookout point.
Departed Puerto Natales in the morning, took the 2.5-hour bus ride to Laguna Amarga, bought my entrance ticket. Hiked the 7km from Laguna Amarga to the trail entry point at Hosteria Las Torres, which wasn’t such a great use of time and energy – it was a nice but monotonous walk that ran along the road.

The trail from the Hosteria to Camp Chileno (where we were to spend the night) is a almost all ascent, and takes about two hours. I found it tough, because I was still finding my rhythm and trying to getting used to my backpack weight.
You start off in a kind of a wide plain and then switchbacks appear, leading you into a valley, ascending gradually the whole time.


(Click on any photo to expand)
We reached Camp Chileno some time after lunch, and after checking into the camp, collecting our sleeping bags and dumping our bags behind, we started off to the Torres. Don’t set off too late, especially if you’re unsure of your pace – it takes the average person a good 2-2.5 hours to get from Chileno to the towers and back. This excludes the time spent lingering at the mirador taking photos, and any rest stops in between.
A lot of people choose to do it the next morning because the sunrise turns the towers pink, but we figured we should go while the weather was clear. Some people do it twice, to see the towers in two different kinds of light.
I am neither that committed nor fit enough to attempt it, but I’ve seen photos of the towers in morning light and it is stunning, so don’t write it off.
The hike is pleasant through the woods, but becomes much steeper in the last bit, and the terrain also becomes very rocky. This is why you shouldn’t set off too late, and why you should bring warm clothing and a head lamp – it gets very very cold once the sun is gone, and it also becomes dangerous to hike on such terrain without light.


We made it, and got to see the towers crisp and clear, even as the light was fading. There weren’t many people this time of the day, and it was pleasant. I don’t know what it’s really like at sunrise or during high season, but there were less than 10 of us there.

By the time we got back to Camp Chileno, the light was almost all gone (around 7pm), and we were starving. The refugio’s dining hall was packed, and we had to wait to eat in the “second sitting”, around 8pm.
Unfortunately for those who waited to hike the next morning, it was a foggy morning and they couldn’t see the towers at all. Nature is cruel like that.
Day 2
Total distance walked: 18.5km
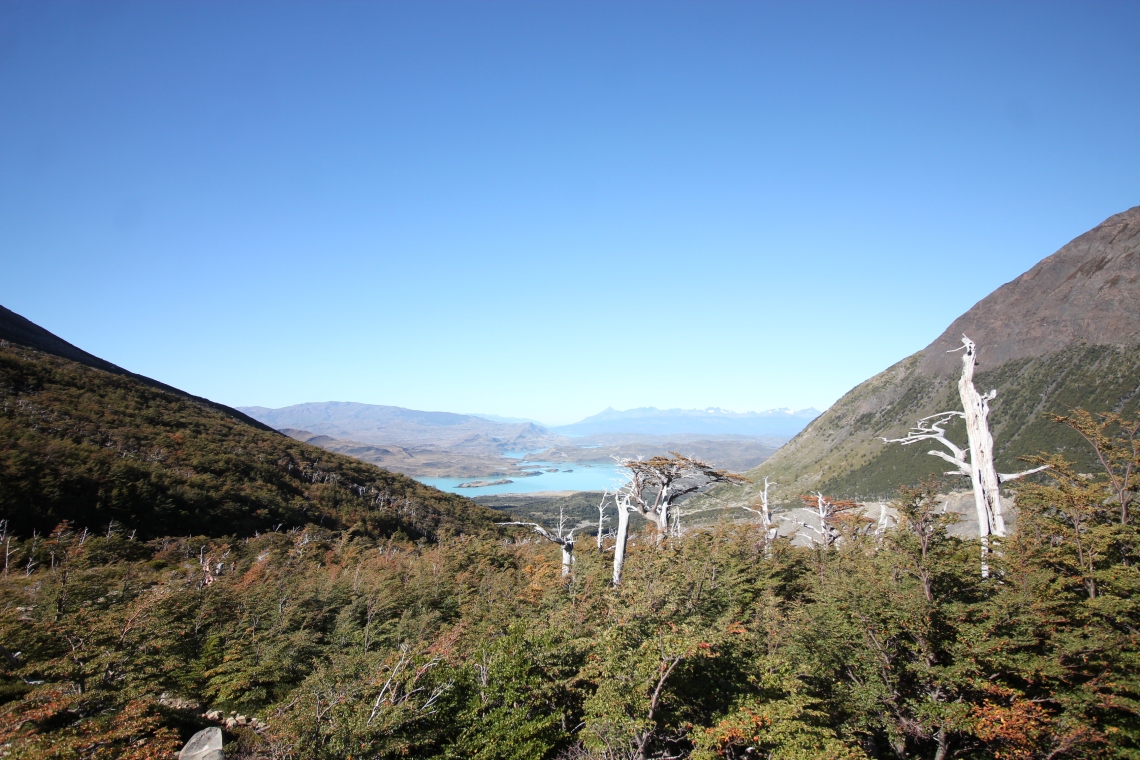
We left Camp Chileno early morning, with Domo Frances (our next accommodation, a refugio) being our destination for the day. Coming from the direction we did, Domo Frances is about 2.5km further than Camp Los Cuernos, which is where a lot of people choose to camp for the night, but it was the only accommodation we could reserve for this particular day.

Day 2’s hike can get quite monotonous in parts, but I enjoyed walking by Lake Nordernskjold. The trail isn’t especially strenuous, but it is rocky in parts though, so you have to watch for twisting your ankle or stubbing your toe. The day started pretty overcast, but by noon it had become bright and clear.


(Click on any photo to expand)
We reached Domo Frances fairly early, but we actually got lost trying to find it – the signage was confusing and we made a few false turns. My advice is to ask, ask ask every time someone comes by.

Ironically, although we weren’t camping, I discovered the next day that TDP’s notorious mice had gotten into my backpack into the refugio dorm room, and nibbled at quite a bit of my food. I had left my pack on the floor, thinking that since I wasn’t camping, I didn’t need to hang my food somewhere secure.
Day 3
Total distance walked: 21.6km, including having to go up and back down the valley.
Elevation gain: About 500m from Camp Italiano to Mirador Britanico
This is a pretty spectacular day, because it takes you to another big highlight of TDP: the French Valley.
We hiked from Domo Frances to a campsite at the bottom of the valley called Camp Italiano. This where everyone ditches their heavy bags and just brings their daypack for the hike up the valley.
There are 2 main look-out points in the valley – the first one is marked as Mirador Frances on the official CONAF map, and it’s a great spot with panoramic views – you feel so close to the mountains and you can hear the avalanches.


The second mirador is higher up, called Mirador Britanico, and it gives you more a sweeping view of the valley and russet and gold fall foliage.


From Camp Italiano to Britanico, it takes about 2.5-3 hours one way at a comfortable pace, but don’t forget the estimated trek times on your map don’t include long stops for lunch gawking at the view. If you’re tired or strapped for time, you can just turn back at Mirador Frances since the view there is already stunning.
After getting back to Camp Italiano, we got a bit lost trying to pick up the trail again to get to Camp Paine Grande – and had to double back to the guardhouse at Italiano to ask for directions (to avoid this, just ask for super explicit directions when you’re getting ready to leave, or follow other hikers going to the same way.
Add to the fact that we hung around too long at Mirador Britanico, we ended up reaching Camp Paine Grande after 7.30pm. It was a pity to rush, because the scenery along the way was very beautiful and serene.


(Click on any photo to expand)
Day 4
Total distance walked: 11km, excluding the hike on Glacier Grey.
The hike from Paine Grande to Refugio/Camp Grey starts off easy, until the stretch after the beautiful lookout point to Glacier Grey – after that there’s quite a bit of up and down through narrow, rocky trails running along a stream, and you had to be careful with your footwork going down.


(Click on any photo to expand)
It felt a lot longer than 11km (maybe because we were tired), and we wound up about 15 minutes late for our glacier hike at Glacier Grey, which started at 2pm.
Thankfully they waited for us. By then, I was starving because I hadn’t had a proper lunch. The hike starts with a short boat ride to the face of the glacier, followed by a 40-minute steep climb up the rocky sides to get to the top of the glacier. The whole time, I heard my stomach growling.


(Click on any photo to expand)
It was worth it though -the hike was stunning. I’ll never forget the sight of the evening sky and the glacier as we took the boat back to the shore.


If you don’t do the ice hike, you can explore the various look-out points around Refugio Grey to get good views of the glacier.
Day 5
Total distance walked: 11km
You have a couple of options for Day 5:
1) Wake up early and hike briskly back to Camp Paine Grande to catch the morning catamaran ride (around 11, 1130am, please check), which will bring you back to the park entrance to catch a bus back to Puerto Natales.
2) Sleep in, and hike leisurely to Camp Paine Grande to catch the late ferry – which unfortunately is really late, like around 5.30 or 6pm.
Always check the ferry times before you trek because they vary according to seasons.
If you do the late option, you can explore the view points around Refugio Grey which you might have missed if you had chosen to do the ice hike the day before. But you need to be disciplined about time so that you don’t start off too late and miss the ferry.
We opted for the late option, and took our time getting back to Paine Grande, but still had hours to kill before the ferry arrived.
Refugio Paine Grande is relaxed about people sitting around their premises, and you can choose to lunch there if you like. I relished slow hike back,, taking in the little details: the views, the air, the light. At Paine Grande, I wrote in my diary, read, and chatted with other hikers.
The evening Lake Pehoe crossing is really beautiful too, and it felt like a gentle way to say goodbye to TDP, watching the mountains you huffed and puffed past days earlier rolling past you.


(Click on any photo to expand)
The downside is that by the time you reach Puerto Natales, it’s nighttime. You’re probably starving at this point too. But we had a nice hostel booked (Hostal Coloane) and so got a good rest.
All in all, we hiked 82.9km, according to map distances provided by CONAF and Fantastico Sur.
Tips on Torres del Paine and the W
- Don’t decide to do the W on the fly. Advance reservations are required to spend the night in the park, and even in the shoulder season, I encountered full refugios. A limited quantity of spots at the free sites is up for reservations at any given time, so get moving and book here. For the paid campsites and refugios, go to the Fantastico Sur and Vertice websites to make reservations. Vertice’s website is terrible, so be patient, and email them directly to resolve issues.
- The shoulder season is a great time to go. Compared to some photos I’ve seen of the W during peak season, my experience in April didn’t seem so bad. (Or maybe I’m comparing to the madness of trekking in Nepal…)
- Doing the O circuit will allow you to escape the worst of the crowds. Obviously not everyone wants to trek for 9 days, so if your stamina is up to it, go for it.
- Experienced hikers say the estimated hiking times in the CONAF park map (see here) are too conservative and most people take less time. But for the not-very-pro types like me, the walking times were spot on.
- But, the hiking times in the official map are JUST hiking times. They don’t factor in things like very long lunch breaks. If you take a long break, you’ll need to make up for it by hiking faster to make it within the estimated timeframe on the map.
- The weather is TDP is notoriously changeable, regardless of season. My photos only show blue skies, bright sun, and nice and dry trails. Imagine them with snow, rain and lashing wind – it could happen to anyone so always prep for the eventuality.
- Drinking water is available throughout the park, in the form of the many streams running through it. You can drink the water unfiltered.
- There are mice in TDP, and they will chew through your backpack or plastic bags to get to your snacks. This is why campers hang their food in trees (bring para cords or a clothes line). Even in refugios, one or two might sneak in, so always take your food out and hang it somewhere around your bunk.
- The CONAF map given to you when you pay your entrance fee indicates cut-off times for different sections of the trails. This means you’re not meant to set off after those times, because you won’t make your destination before dark.
- Print out your accommodation reservation details. Yes, park officials check them.
Tips about Puerto Natales and Punta Arenas
- The most reliable way of getting to Puerto Natales from Santiago is still via a flight to Puntas Arenas, followed by a bus to Puerto Natales. At one point, there were direct flights from Santiago to Puerto Natales on Sky, but they don’t seem to be available any more. In any case, they were only available during certain months and days of the week when I checked in March 2017.
- You can catch a bus straight to Puerto Natales from the Punta Arenas airport. The staff at the airport say you need to go into Punta Arenas town proper, but just ask the bus drivers when they pull up at the airport. They usually say yes, and this means you don’t waste time travelling into the town, and have a shot at catching an earlier bus.
- Land travel distances are big in Patagonia. The bus ride from Punta Arenas to Puerto Natales takes around three hours. Torres del Paine National Park itself is about another three hours away from Puerto Natales. Factor all this in so that you don’t exhaust yourself travelling – for example, at least two nights in Puerto Natales to bookend your trek in TDP.
- You can get around Puerto Natales on foot. I walked to both my hostels from the bus terminal within 10 minutes.
- You can buy or rent camping gear in Puerto Natales, and it doesn’t cost much.
- In Puerto Natales, I stayed at two lovely hostels: Erratic Rock (they do daily 90-min talks on trekking in TDP and they’re attached to a buzzy bar filled with local and foreign trekkers and it’s great for meeting people) and Hostal Coloane, which is peaceful and prettily decorated, has AMAZING hot showers, and run by terrific people who make you feel at home without being obtrusive.

Your two posts are fantastic and spot on. I did the w years ago but would love to go back for more! You got soooo lucky with the weather! I’ve enjoyed reading this morning, thanks for sharing.
LikeLike
Thanks! I hope to go back too – to hike the O, and to do other hikes in the region. And I did get very lucky with the weather – we fretted so much before the trip and were convinced we would freeze to death in the camps.
LikeLiked by 1 person