

Recently, someone asked me for some advice about hiking in Torres del Paine and (Patagonia in general), and her four simple questions unleashed an outpouring of thoughts and jumbled bits of advice I forgot I had.
Trekking the W circuit in Torres del Paine isn’t a new thing – plenty of travel/adventure bloggers have generously shared their tips and information for free, and I relied on them greatly to plan my own trip in March last year. As such, I hadn’t felt a strong need to share such advice here, although I did write about the overall experience here.
But answering those questions made realise that jotting down my own observations on this blog is also my way of paying it forward – especially since I can share from the perspective of an outdoors amateur who hadn’t been on an unguided trek before.
So here’s a two-part guide, beginning with an FAQ for anyone thinking about hiking in that magical place.
In part II (go here), I break down my itinerary and observations of each day, and share some other general tips.
#1 – Do you need to be physically fit to do the W?
The short answer is yes – you should be someone who exercises at least three times a week.
The long answer – you don’t need to be marathon-fit to do the W, just reasonably active and free of serious injury.
I’ve gone on trips where I felt like giving up, like I would never make it to the top. The W isn’t one of them, and it’s not because I’m extraordinarily fit. Before I went for the trek, I was your typical urban dweller who sat in an office a lot, and my only exercise was yoga about three times a week.
To me, the W feels more like a slow burn, boiling down to whether you see yourself walking 7-8 hours a day for 4.5 days, covering about 75km in all. Some days, you walk around 20km. Not everyone likes the monotony of walking all day, for several days, no matter how beautiful a place is.
The unpredictable weather is another factor that affects you physically – stories abound of snow one day, sunny days the next, winds that knock you off your feet, rain lashing from all directions. There’s no saying what can happen, and you have to be physically (and mentally) prepared.
It’s a moderately tough challenge for someone new to long, multi-day treks, but it’s not out of reach. This is because:
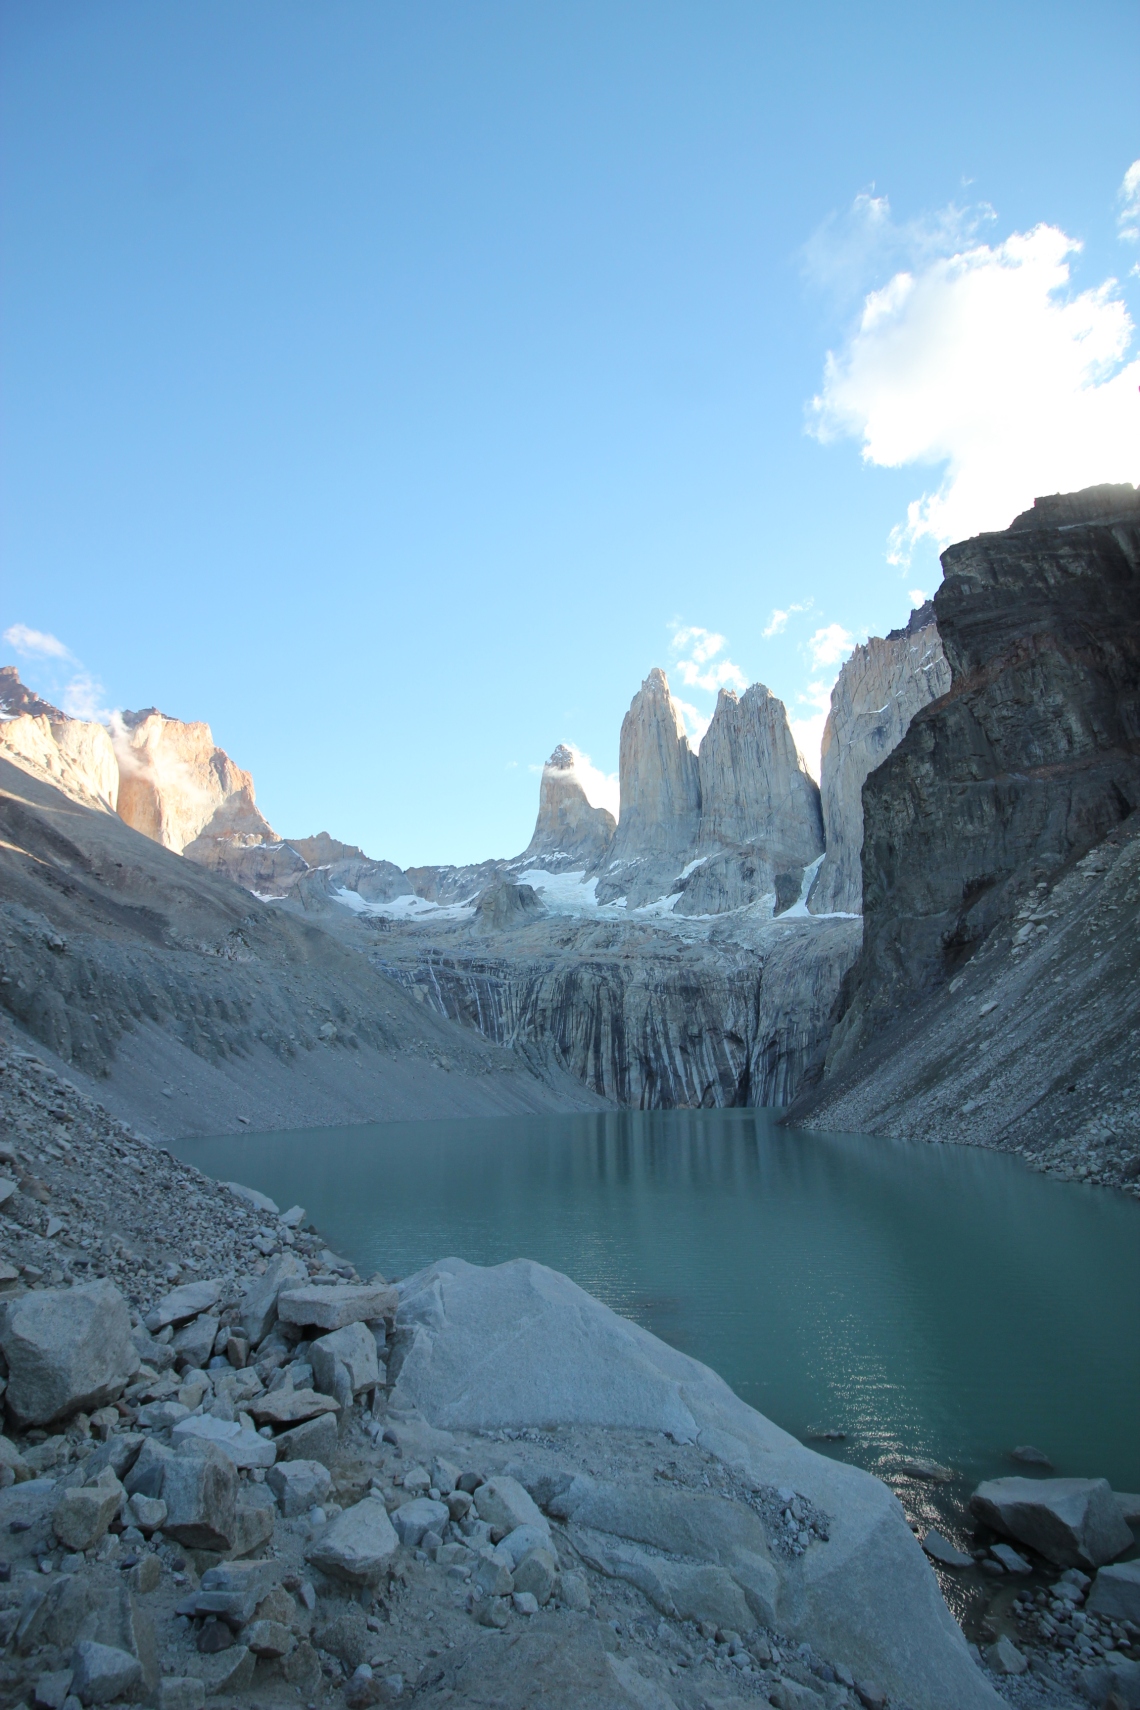
- The W trail doesn’t cross into the kind of altitudes that makes one sick, or at the very least, unusually short of breath. The hike to see the towers proper (the mirador at the base of the towers is about 850m above sea level) has some steep stretches lasting about 10 to 20 minutes. The terrain also slopes up and down throughout. But overall, there are no tough ascents. In contrast, the four-day Inca Trail trek in Peru is only about 40km in all, but feels like murder because of long ascents, and the altitude (a high of 4,200m).
- You don’t necessarily have to do the W the hard way. I camped, but I did so in the privately-run campsites which also rent out tents and sleeping bags, and have dining halls. This meant I didn’t need to carry camping gear and food supplies. This is expensive, but I was still learning about my limits as a hiker, and knowing I would be less encumbered by weight made me feel more confident. For those seeking even more comfort, you can stay in the hostels (called refugios) found throughout the W (more on this below).
- The trails are reasonably well-marked, relieving you of some of the mental stress of staying on course. Getting lost and having to detour or double back is to me, the most draining part of independent hiking. That said, on one stretch of the W, I followed a trail up a slope for 15 minutes, not realising I had wandered off at a fork that had no signage, until my friend caught up with me. On hindsight, the complete absence of other hikers on such a popular stretch should have been a warning.
Newbies face extra uncertainty, and it’s important not to underestimate the mental endurance needed to deal with this. We’re new to everything, and we worry about whether we’re walking fast enough, whether we have enough time to cover the remaining distance before the sun sets, whether the path is going to get any steeper, and wondering if we missed any of the trail markers.
When my friend and I started our W trek, we certainly felt intimidated by all the super-fit types who trotted past us, gabbing a mile a minute while they seemingly flew up and down the trail, clutching Go-Pros. We seemed to always reach campsites an hour after everyone else.
But we got over it. So long as we were safely within range of completing the day’s trek before sundown, who cares? The mountains aren’t going anywhere, they’ll still be there when I reach.
And more importantly, I never felt like I was in danger of being unable to complete the trek.
#2 – East-to-west or west-to-east?
You can do the W in two directions. East-to-west means you see the famous three towers on the first day, and Glacier Grey last, and vice versa for west-to-east.
In the middle of the W, you have to trek the same section in the French Valley twice – from Camp Italiano up to Mirador Britanico and back. On the western half, you have to trek the stretch between Camp Paine Grande and Glacier Grey twice – to and back. This is regardless of whichever end of the W you start with.

We did it east-to-west, simply because if we did the reverse, some campsites wouldn’t have been available to us.
Aside from that, I can’t fathom what real difference it makes in terms of views. And I don’t think it’s easier either way – the W is one of those treks where “what goes up, must come down”. Any downhill easing the burn in your quads will be matched by an upward slope, in either direction.
For what it’s worth, I found the first day of our trek the toughest: we started at the park entrance at Laguna Amarga, walking all 7km to the trail (don’t ask me why, when there were cheap shuttle buses to catch). From the trail entry point, the trek up to Camp Chileno is mostly uphill, and it was rather a shock to my system – I had landed in Chile after a 25-hour flight only two days ago.
After ditching our backpacks at the camp, we hiked up to the mirador at the base of the towers to admire the towers (and say hi to a fox!) and back down again to Camp Chileno, where I spent the night.
It felt like a really long day, not least because in all, the elevation gain to the Torres was close to 800m.
The days after that felt more manageable, although no less long. And it wasn’t anti-climatic to see the “star attraction” on day one – the French Valley and Glacier Grey in the days to come were just as amazing.
#3 – Actually, why do the W (or O or Q) at all?
Good question. After all, if you drive, renting a car lets you cover some really beautiful sights in the park with relative ease.
There are also day hikes to be done, some of which are on rarely-visited trails, compared to the very popular W, which I hear is horrifyingly crowded during the peak months of January to February (I went in late-March/early-April).
But — TDP sits pretty far away from big towns of any kind. The nearest big town is Puerto Natales, almost three hours away by bus, and it doesn’t make for a convenient base.
Staying in a hotel in TDP – the Las Torres – is pretty expensive, and if you don’t have a car, your options for getting around might be limited to joining a guided tour/trek that provides transport.
Finally, not all the trails in TDP are freely accessible – some require you to take a guide.
When you consider all these things, doing the W, O or Q trek isn’t a bad idea.
#4 – What about El Chalten?
If you prefer basing yourself in one place and explore Patagonia via day hikes, the town of El Chalten on the Argentina side seems like a good place to do that. I didn’t go there, but friends did and had only good things to say about the experience.
Exploring Patagonia via El Chalten has its advantages, despite Argentina being an expensive country to travel in. There are no national park fees, and trails are accessible by foot from the town, so you don’t need to trek for days with a heavy pack – you can return to a “home base” every night. Campsites along the trails near El Chalten are mostly free too.
Ideally, you should find time (and money) to explore both the Argentinian and Chilean sides. I wish I did, but then again, I wish for many things…
Here’s a blog post that gives you an idea of the comparison between hiking in TDP vs around El Chalten.
I also need to stress that exploring Patagonia isn’t reduced to either Torres del Paine or El Chalten. These are just two widely-accessed entry points that most people head to, and they happen to be beautiful enough for many people to simply not go further. But Patagonia is vast, and if you have the time, resources and temperament, be adventurous!
#5 – What are refugios and campamentos, and what are the pros and cons?
In TDP, you can choose from free park campsites, called campamentos, privately-run campamentos, which charge a range of fees, and refugios, which are privately-run hostels. There’s also an actual hotel, called Las Torres, located near the stretch of the trail leading to the towers.
The free campamentos have a basic cooking area, dirt camp grounds, and basic toilets. You need to bring your own food and camping kit, including a camp stove for cooking.
The paid campamentos vary in design – some have wooden platforms, some are grassy knolls, some have indoor kitchens where you can cook quite comfortably (but you need to your own camp stove), and all have decent bathrooms with showers (hot ones!). They are usually next to the refugios, and you are allowed to use refugio facilities, like the indoor (and heated) common rooms. If you don’t want to cook, you can pay for expensive meals (and beers) in the dining halls, and there’s usually a basic supplies store selling food items at eye-watering prices. You can also rent your camping kit (tents, sleeping bags etc) from these sites.
The refugios are basically hostels, with bunk beds and shared bathrooms, and the amenities I mentioned above. I stayed in Domo Frances, which looks pretty cool, but it was freezing at night when you get out from under the covers.


Staying in the privately-run facilities relieve you of the weight of carrying your own kit and food for 5D4N, but it gets pretty expensive (see below). I went the expensive route, and I admit, it was nice to not worry about setting up camp and cooking at the end of each long day. But now that I’m more confident about my abilities, I’ll give shouldering heavier loads a go on future trips.
#6 – How much does it cost?
In a nutshell, unless you only stay on the free CONAF-run campamentos, and bring your own camping kit and your entire food supply, hiking and camping in the W can get expensive.
Two private operators run the paid campamentos and refugios – Fantastico Sur in the eastern half, Vertice in the western half. Fantastico Sur’s campamentos in particular cost more, because they’re full-board options.
For example, a night at their Camp Chileno and Camp Cuernos is currently CHP65,000 per person during the “normal” season (the shoulder season between high and low). This is for renting a camping platform (this alone is CHP48,000) to camp on, a rental tent, a sleeping bag and mat, and three meals (dinner plus breakfast and a packed lunch the next day). That’s about S$144. To camp.

You can’t opt out of the meals at these two sites, because there are no cooking facilities available for campers, and rules about where you can start fires in TDP are extremely strict because of past fires that burnt down swathes of forest. You can bring your own tent, sleeping bag and mat, to trim down some of the costs, but I can only say whoever owns Fantastico Sur must be doing real well.
To be fair, the refugios do not operate in winter, and so have a relatively short window to make money and keep people employed. It’s also no easy task getting supplies in, and keep people in relative comfort in the middle of nowhere.
On the western half, the Vertice campsites are more flexible – the campsites have cooking facilities, so if you brought your own food and camping kit, you only need to pay a small fee to camp there. Refugios are full-board.
The Torres Ranger Station campsite is one free option in the eastern half of the W, but it was closed when I was there in late-March 2017. The other free campsite on the W trail is Camp Italiano. Both must be booked in advance and early, because they’re popular, for obvious reasons, although I have no idea what the quota actually is.
Here’s a breakdown of my overall costs per person in 2017, including the associated costs of travelling to the Patagonia region from Santiago, ground transport, and a couple nights’ stay in Puerto Natales. We also splurged on a 5.5-hour glacier trek on Glacier Grey on our second-to-last day in TDP (worth it).
| Accommodation, plus sleeping bag and tent rental, and full board, for four nights in TDP** | S$571 (or US$430) per person, based on the exchange rate at the time*** |
| TDP Park fees | CHP21,000 for foreign nationals, or around S$40 then |
| Two nights’ accommodation in Puerto Natales (private rooms) | CHP40,000, or S$76 at the time |
| Bus rides between Puerto Natales and TDP | CHP15,000 two-way, or S$28 at the time |
| Bus rides between Punta Arenas and Puerto Natales | CHP14,000 two-way, or S$26.60 at the time |
| Return flight between Santiago and Punta Arenas | US$143, or S$203 at the time |
| Glacier trek on Glacier Grey led by Bigfoot Patagonia | CHP95,000, or S$180 at the time |
| Catamaran across Lake Pehoe from Paine Grande to park gate, to exit park | CHP15,000 one way, or S$28 at the time |
** — Camp Chileno, Domo Frances (a refugio), Camp Paine Grande and Camp Grey
*** — Note to fellow Singaporeans, the exchange rate between CHP and SGD has become less favourable for us since my visit in March 2017.
Total: About S$972.60, or S$1,152.60 with the glacier trek.
#7 – How do you prepare for the trek?
If you’re not active, get active! I didn’t go beyond my usual yoga routine and while I felt fine throughout, I think I would enjoy it more if I were fitter. For example, walking faster does mean you can get to campsites earlier, and that gives you more time to set up and rest.
For any kind of outdoors trip, stair training works best for me, because it works the climbing muscles, and taking the stairs down improves your agility.
If you’re carrying your own tent and sleeping bag and food, it can easily come up to 8kg and up. Even if you don’t carry those things, you might still be carrying about 2-4kg of stuff. This doesn’t seem like much, but if it’s your first time, you’ll definitely feel the strain after a few days.
#8 – Suggested packing essentials?
- Good hiking shoes/boots and socks. I saw people hiking in light exercise trainers, and I don’t know how they did it, but I can’t. The terrain, even when flat, has jagged, rocky bits, rather like hiking on a dry and rocky river bed (particularly along Lago Nordernskjold). This is prime ankle-twisting ankle territory for me, and so I was glad to have shoes with good support and tread. I also appreciated that my boots were water-resistant – there are a few boggy areas here and there and walking in soaked-through shoes is a surefire way of getting blisters.
- Hiking clothes that can be layered. The weather in TDP is notoriously changeable, and while I experienced only gloriously dry and sunny (but chilly) weather, I know it’s only because I was lucky! You want to be able to add and strip layers as you go along. For example, I always try and get warm during breakfast by wearing a light down jacket, and then I strip off to a long-sleeve base layer when I start walking, sometimes with a very lightweight down vest on. I keep the down jacket easily accessible so I can put it on when I take breaks – it gets cold, especially when there’s no sun. I would also bring gloves – it gets cold and you don’t always want to keep your hands in your pockets.
- Warm and dry things for downtime. Once you stop hiking, the cold sets in. So bring something light yet cozy – like a fleece sweater, or hoodie – to wear around the campsite at night and in the early morning.
- Slippers or sandals to give your feet a break from being encased in shoes all the time. Also essential for shared toilets.
- Sun protection. It can be freezing and yet blindingly sunny, and some sections of the trail are pretty open without shade. I prefer wearing a sunhat to minimise having to reapply sunblock, and I wore long-sleeved base layers to keep the sun off. Sunnies are also essential – the glare coming off the snowy mountains and glacier can be painful.
- Rain and wind protection. A really good quality rain jacket makes all the difference when you have hours to go.
- A big water bottle. The nice thing about TDP is that you can drink straight from the many streams running through the park – just make sure you bring a nice big water bottle to fill it. I managed with a 1-litre bottle with a wide mouth, and never went thirsty – I always found a place to fill before it got anywhere near empty.
- A headlamp. There’s always a chance you fall behind schedule and end up hiking in the dark, especially if you are new and unsure of your pace. Headlamps are much handier than torches when hiking, and good for camping too – digging for stuff in your tent at night, cooking outdoors, going for a pee break in the night…
- A good backpack. Your backpack is going to be an extension of your body for five days. Don’t skimp on it – make sure it has comfortable padded straps, good hip straps to take the weight off your shoulders, and some webbing to minimise contact with your back so that air can circulate and it doesn’t get stifling. The smaller the bag, the less you’ll overpack, haha – a 40-litre pack is more than adequate for the W.
- A day pack. Not everyone needs this, but I did when we left our heavy packs behind to hike up to the towers, or up the French Valley. I always keep water, dry snacks and a torch with me, and I had a DSLR to lug along. I also like taking my down jacket with me even when it’s not cold, because who knows? My daypack is lightweight enough to roll up and stuff into my backpack when I wasn’t using it.
- A small stash of snacks. Like a Kit Kat? Bring some! Stuff like that costs an arm and a leg in TDP. Personally, I like having hard sweets I can suck on to keep my mouth from feeling dry as I walk. As for chocolate – M&Ms (with peanuts) don’t melt and make a mess.
- A good quality trash bag. You have to take all your trash with you as you go along, including organic waste like apple cores. Make sure the bag is a good one – I saw people using thin plastic bags and dropping trash all over as they walked because they’d tied it to the outside of their backpacks.
For planning purposes, I also found these blogs/websites to be extremely useful, and their advice is spot-on:
Miss Tourist – A really helpful starter guide to addressing your primary concerns when you start planning your trip. Having been there, I agree with most of her observations.
The Outbound – Good tips here once you’ve decided you’re going to do the W.
Be My Travel Muse – Good camping advice here, not just for hiking in TDP but in Patagonia in general.
Adventure Alan – Meticulously updated and minutely-detailed, this guide to trekking in Torres del Paine is impressive and essential. It’s a little overwhelming if you’re just starting your research, but it will become indispensable when you start looking for specific information, beyond general tips.
More questions? Ask away!
